

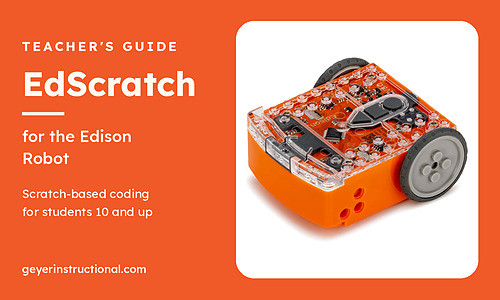
EdScratch Programming for the Edison Robot
16th Nov 2026
If your students have already used Scratch, EdScratch will look familiar the first time they open it. The blocks stack vertically, the categories sit on the left, and the work is the same: snap commands together until the program does what they meant. The difference is that this program runs on an Edison robot, not a sprite on a screen.
This guide walks through EdScratch programming for the Edison robot: what the language is, how to program an Edison robot with it, how to use the robot itself, and how to reset it when you want the original out-of-the-box behavior back. For Edison V3, the other coding options and class sets, start with our Edison robot teacher's guide.
What is EdScratch?
EdScratch is a vertical, block-based programming language for the Edison robot, based on Scratch. Students drag and drop blocks to control the robot's motors, sensors, lights and sound. The app runs in a web browser at edscratchapp.com, it's free to use, and Microbric designed it for students aged 10 and up.
You don't install anything. Open the site, stack the blocks, and download the program when you're ready. The same Edison also runs EdBlocks and EdPy, so a student can move from icon-based blocks to EdScratch, then to text-based code, without new hardware. There is no offline version; the app needs an internet connection because each program has to be compiled before it can be sent to the robot.
EdScratch is developed by Microbric using open-source software created and maintained by the Scratch Foundation. EdScratch for Edison V3 can display in several languages, including Spanish, German, Polish, Portuguese and French. Choose one from Language in the app's menu, which helps in multilingual classrooms.
How do you program an Edison robot with EdScratch?
Open EdScratch in a browser, write a program or load a demo, connect Edison V3 with its USB cable, and click Program. Select "Edison V3 – Paired," wait for the success sound, unplug the robot, and press the triangle button to run it. On iPads, the program transfers by screen flashing instead.
The first time you try this with a class, run Microbric's Test program demo so you know the devices and browsers are set up before students start writing their own code.
On a computer, Chromebook or Android tablet
Edison V3 uses a browser feature called WebUSB to program over the cable, so the browser matters.
- Open edscratchapp.com in Chrome, Edge or Opera. Firefox and Safari will not program Edison V3 over USB.
- Click Menu, choose Load demo, and select Test program.
- Plug Edison V3's USB cable into a USB-A port. USB-C-only devices need a USB-C to USB-A adapter.
- Click Program in the top-right corner of the app.
- In the popup, select "Edison V3 – Paired" and click connect.
- Wait for the success sound, the same tune Edison plays when you turn it on.
- Unplug the cable, tuck it back under the robot, and press the triangle button to run the program.
On an iPad
Apple doesn't let a browser use the data port, so the program is flashed to Edison's line-tracking sensor instead. Open the same app in Chrome, Firefox, Safari, Edge or Opera, load the Test program demo, and click Program. Set the robot on the on-screen outline, press the round button once (both LEDs should come on), then click Download program. When you hear the success sound, press the triangle button to run it.
Microbric suggests 80 to 90 percent screen brightness and staying away from bright light, especially sunlight. If a download fails, try a slower speed and make sure the iPad isn't in a power-saver mode that dims the screen.
If you're using Edison V2
Older Edison V2 robots (and V1) program through an EdComm cable that plugs into a headphone jack, not USB. Turn the device volume all the way up, turn off sound enhancements, press the round button once, then click Program Edison and wait for the success sound before you unplug. Microbric doesn't recommend phones as programming devices for this, because most don't put out enough volume.
One thing that surprises some teachers: Edison stores only one user program at a time. Downloading another EdScratch program replaces whatever was already there. That's useful to know when a student says the robot is still running yesterday's code.
How do you use an Edison robot?
To use an Edison V3 robot, press the triangle button to turn it on; it chirps and the red LEDs flash. After that, the triangle runs a program, the square stops it (hold it for about three seconds to turn the robot off), and the round button downloads a program with one press or scans a barcode with three.
| Button | What it does |
|---|---|
| Triangle (play) | Turns the robot on, or runs the program that's loaded |
| Round (record) | One press starts a download (including screen flashing on iPads); three presses scan a barcode |
| Square (stop) | Stops a program. Hold for about three seconds to turn the robot off |
Edison V3 also turns itself off after a few minutes of inactivity, so if a robot goes quiet between groups, try the triangle button before you assume the battery is dead.
Before students open EdScratch, let them use the robot once with no screen at all. Every Edison comes with pre-set programs already in memory, including clap-controlled driving, avoid obstacles, follow a torch, line tracking, bounce in borders, and sumo wrestle. Place the robot on the white just to the right of a printed barcode, make sure the small plastic skid is in place under the front, press the round button three times, and wait for the success sound. Then press triangle to run it. Use matte paper or matte laminate, keep the robots out of direct sunlight, and don't resize the barcodes when you print them. If you want a mat with the barcodes already printed, we carry EdMat activity mats.
What's inside the EdScratch app?
EdScratch has a block palette on the left, a programming area in the middle, a Program button in the top-right corner, and a "bug box" along the bottom that checks the program as students build it. Blocks are color-coded by category, from Drive, LEDs and Sound to Sensing, Operators and Data.
Here's what each category is for:
| Category | What it's for |
|---|---|
| Drive | Drive, turn and spin by distance, time or degrees |
| LEDs | The red lights, plus the infrared LEDs used for messaging |
| Sound | Beeps, musical notes and note sequences |
| Data | Variables. This category looks almost empty until you click "Make a variable" |
| Events | Sensor-triggered interrupts, such as a clap or an obstacle |
| Control | Loops, waits and if-statements |
| Sensing | Turn sensors on or off and use their readings as inputs |
| Operators | Math and comparison blocks that plug into other commands |
| Comment | Notes in the program. The compiler ignores them |
The bug box checks the program as students build it. Red messages block a download until you fix the problem. Yellow messages still let you download, but the program may not behave as expected, often because of a logic error. Microbric publishes a free warning-messages guide on the EdScratch page if you want a reference on your desk.
- To use variables, open the Data category and click Make a Variable. Names can use letters, numbers and underscores, but not a leading number, spaces or other symbols.
- Event blocks start subroutines when a sensor is triggered. You can only have one of each Event block in a program, and they can't be duplicated.
- Some blocks have greyed-out oval or diamond holes for input values or true/false conditions, filled with matching blocks from Sensing or Operators.
To save a program, go to Menu, choose Save to device, name the program and click Save to computer. The file goes to your downloads folder. Edison V3 programs use a .edscratch extension; older V1 and V2 programs use .ees and open in EdScratch for Edison V2. To open a saved file, use Menu, then Load from device.
How does EdScratch compare to EdBlocks and EdPy?
EdScratch sits in the middle of Edison's programming ladder. EdBlocks is icon-based and recommended from age 7. EdScratch is the Scratch-style language from age 10, with variables, events and more control over the program. EdPy is a Python-based text language recommended from age 13.
| Option | Recommended age | How it works |
|---|---|---|
| EdBlocks | 7+ | Icon-based drag-and-drop blocks, laid out horizontally |
| EdScratch | 10+ | Vertical blocks based on Scratch, with variables and more control |
| EdPy | 13+ | Typed code based on Python |
You don't have to pick only one. The same robot runs all three, so a set can be shared across grades. EdScratch suits students aged 10 and up, with stronger students pushing into EdPy when they're ready. Our Edison robot teacher's guide covers the rest of that ladder, including barcodes and Card Coding.
A first week with EdScratch
Microbric publishes the free EdScratch lesson plans and teacher's guide under a Creative Commons license, so you can print, adapt and translate them. If you just need robots on tables the first week, this sequence works well.
Day one: confirm every device can talk to a robot. Load the Test program demo, download it, and let each pair press the triangle button. If a laptop won't connect, it's usually the browser or a missing USB-A adapter, not the robot.
Day two: drive, turn and beep, then try a square. Have students make Edison drive forward, turn, and play a sound, then try to trace a square. It often doesn't come out square on the first try. That gap between what they coded and what the robot did is where the thinking starts.
Day three: introduce a loop. Once they've stacked the same four blocks four times, a loop saves the repetition. Ask them to change the number of repeats and predict what will happen before they press play.
Later in the week, turn on a sensor. Obstacle detection and line tracking both give students a reason to use if-statements. If you'll add building projects, the EdCreate creator's kit includes programming challenges that use EdScratch.
Work in pairs: one student codes, one tests, and they swap. Number every robot and its spot in the bin. EdScratch needs a live internet connection, so a cart that can't get online will stop a lesson even if the robots are charged. If a robot starts pulling to one side, run a drive calibration before you assume it's broken.
How do you reset an Edison robot?
You can't factory-reset an Edison robot. Because Edison stores only one user program at a time, you can return it to the original out-of-the-box behavior by programming it with the obstacle-detection program, using the barcode in EdBook 1, and then pressing the triangle button.
That's the method Microbric documents. In day-to-day use, you rarely need it. If a student has left a program on a robot and you want it gone, just download a different one. If the robot won't drive straight, that's a calibration issue, not a reset. If a barcode won't scan, check the skid, the lighting and the paper finish before you look for a reset that isn't there. After a messy class, scanning the obstacle-detection barcode puts every robot back to a known starting point.
EdScratch is the language most upper-elementary and middle-school Edison classes will live in. The app and lesson resources are free, and the robot in front of the student is the same one younger students can drive with barcodes and a high schooler can use with EdPy.
You can browse robots and accessories on our Edison robots page, or start with the Edison robot teacher's guide if you're still deciding how a set should be put together. For more than 60 years, Geyer has helped educators find practical products for teaching and learning, and we accept purchase orders and tax-exempt accounts. If you're still making the case to your principal, our post on the benefits of educational robots in the classroom might help.
Quick answers for educators
EdScratch FAQ
QHow do you program an Edison robot?
Open EdScratch (or EdBlocks or EdPy) in a browser, build or load a program, and connect Edison V3 with its USB cable. Click Program, select "Edison V3 – Paired," then unplug the robot and press the triangle button to run it. On iPads, the program transfers by screen flashing. For no screens at all, use barcodes or Card Coding.
QHow do you use an Edison robot?
Press the triangle button to turn Edison V3 on. The triangle runs a program, the square stops it (or, held for about three seconds, turns the robot off), and the round button downloads a program with one press or scans a barcode with three. You can start with a printed barcode or download a program from EdScratch, EdBlocks or EdPy.
QHow do you reset an Edison robot?
You can't factory-reset an Edison robot. Because it stores only one user program at a time, you can return it to the original out-of-the-box behavior by scanning the obstacle-detection barcode from EdBook 1, then pressing the triangle button. To clear a student program in everyday use, just download a different one.
QWhat is EdScratch?
EdScratch is a vertical, block-based programming language for the Edison robot, based on Scratch. Students drag and drop blocks to control the robot's motors, sensors, lights and sound. The app runs in a browser at edscratchapp.com, is free, and is designed for students aged 10 and up.
QWhat age is EdScratch for?
Microbric designed EdScratch for students aged 10 and up, roughly grade 5 and above. Younger students can use barcodes, Card Coding or EdBlocks on the same Edison robot, and older students can move from EdScratch into EdPy when they are ready for text-based code.
QDoes EdScratch work on Chromebooks and iPads?
Yes. EdScratch runs in a browser, so nothing needs installing. Chromebooks, Windows, Mac, Linux and Android devices program Edison V3 over USB; use Chrome, Edge or Opera, and add a USB-C to USB-A adapter if the device has no USB-A port. iPads send programs by flashing the screen at the robot's line sensor.
QHow do I save and load an EdScratch program?
In the EdScratch menu, choose Save to device, name the program and click Save to computer. Edison V3 programs use a .edscratch extension; older V1 and V2 programs use .ees. To open a saved file, go to Menu and choose Load from device, then select the file and click Load program.
QWhy won't my EdScratch program download to Edison?
On a computer, use Chrome, Edge or Opera and plug Edison V3 into a USB-A port. Red messages in the bug box block a download until you fix them. On an iPad, line the robot up with the on-screen outline, raise the brightness, avoid bright light and try a slower speed. Variable names can use only letters, numbers and underscores.
EdScratch is developed by Microbric Pty Ltd using open-source software created and maintained by the Scratch Foundation. The Scratch Foundation does not sponsor, endorse or authorize this content. See scratch.mit.edu for more information. LEGO is a trademark of the LEGO Group, which does not sponsor, authorize or endorse Edison robots or this article. Product details are based on Microbric's meetedison.com and edscratchapp.com, where you'll find full specifications, lesson plans and support.
 Recently Viewed